Power outages are more than just an inconvenience; they can disrupt work, spoil food, and even compromise safety. According to the U.S. Energy Information Administration, the average U.S. home experiences 1.3 power outages annually, each lasting a few hours. For many, that's enough to spark a search for a reliable backup. This guide will walk you through the essential steps and considerations for Automatic Standby Generator Setup and Integration for your home, ensuring you're prepared for whatever nature (or the grid) throws your way.
Imagine never having to fumble for flashlights in the dark again, or worrying about your pipes freezing in a winter storm. An automatic standby generator provides that peace of mind, kicking in within seconds of a utility outage, silently ensuring your home remains powered and comfortable.
At a Glance: Your Standby Generator Journey
- What it is: A permanently installed generator that automatically restores power during an outage.
- Why it's great: Hands-free operation, whole-house coverage, increased home value, ultimate peace of mind.
- Key components: The generator itself and an Automatic Transfer Switch (ATS).
- Fuel types: Natural gas (most common), propane, or diesel.
- Who installs it: Primarily licensed electricians and plumbers, often with a general contractor.
- Crucial first step: Obtaining local permits before any work begins.
- Ongoing care: Regular maintenance and self-testing features keep it ready.
- Safety first: Carbon monoxide detectors are a must; professional installation is non-negotiable.
Why a Standby Generator is Your Home's Best Friend During an Outage
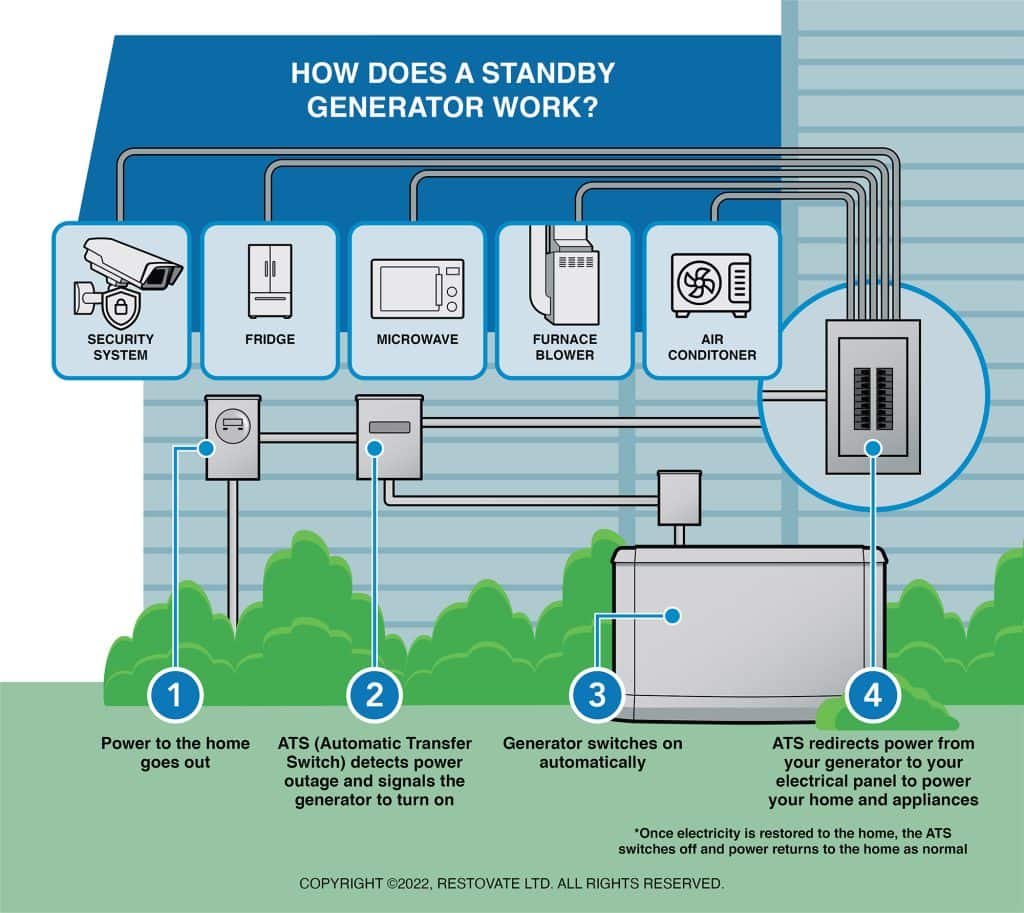
Unlike portable generators that require manual setup, refueling, and extension cords, a standby generator integrates seamlessly into your home's electrical system. It's essentially an invisible guardian, always on watch. The moment your utility power falters, an Automatic Transfer Switch (ATS) detects the interruption, signals your generator to start, and within seconds, switches your home's power source from the grid to your generator. When utility power is restored, the ATS automatically switches back, and the generator cools down and shuts off, ready for its next call to action.
This automatic operation means your refrigerator stays cold, your HVAC system keeps running, and your essential medical equipment remains powered – all without you lifting a finger. Beyond the practical benefits, it offers an incredible sense of security, especially during severe weather or extended blackouts. It can even boost your home's resale value, making it a smart long-term investment.
Choosing Your Power Source: Natural Gas, Propane, or Diesel?
The heart of your standby system is its fuel source. Each has distinct advantages:
- Natural Gas Generators: These are the most popular choice for homes connected to a municipal gas line. They offer an uninterrupted fuel supply, eliminating the need for manual refueling or storage tanks. Once hooked up, they can run for extended periods without intervention.
- Propane Generators: An excellent option for homes without natural gas access, or for those seeking greater fuel independence. Propane is stored in large tanks, which can be refilled as needed. While tanks take up space, propane remains stable for long periods, making it a reliable choice for remote or off-grid locations.
- Diesel Generators: Known for their power and fuel efficiency, diesel generators are often found in larger residential or commercial applications. They require on-site fuel storage, which needs to be maintained to prevent fuel degradation, but offer robust performance.
Your decision will largely hinge on your existing utility connections, local availability, and specific needs for run-time and power capacity.
The Installation Journey: Integrating Your Generator Like a Pro
Successfully installing and integrating an automatic standby generator is a complex project that typically requires a team of licensed professionals. This isn't a DIY weekend task. Electricians, plumbers (for fuel lines), and often a general contractor are essential to ensure safety, compliance with local codes, and warranty validation.
Here's a detailed breakdown of the installation process:
Step 1: Secure Your Permits – Don't Skip This!
Before any ground is broken or wires are run, your very first step is to contact your local building department. You'll need to inquire about all required electrical, fuel, and zoning permits. Failure to obtain the necessary permits can lead to significant fines, delays, and, most importantly, unsafe operating conditions. This also ensures your installation adheres to local building codes, which can vary widely.
Step 2: Prepare the Generator Site
Choosing the right location is critical for safety and efficiency. Your generator must be placed on a stable, level surface at least five feet away from all windows, doors, and vents. This crucial distance helps prevent carbon monoxide fumes from entering your home.
Once you've marked the spot:
- Clear and Level: Remove any vegetation, rocks, or debris.
- Create a Stable Base: Lay a concrete pad or a sturdy gravel base. This foundation provides a solid, level surface and helps prevent vibrations.
- Ensure Proper Drainage: The site should allow water to drain away from the generator, not pool around it, to protect the unit from moisture damage.
Step 3: Position the Generator
Moving the generator is a heavy-duty task, often requiring specialized equipment. Once at the prepared site, carefully position the unit onto its foundation. Ensure it is perfectly level to minimize vibrations during operation and extend its lifespan. Strategically place it to be as close as possible to both your home's main electrical panel and its fuel source. This proximity will help reduce material costs and labor time for connecting a generator to your home.
Step 4: Install the Automatic Transfer Switch (ATS)
The ATS is the brains of your standby system. This critical component must be mounted near your home’s main electrical panel.
Here's what the installation entails:
- Main Power Off: Absolutely essential to turn off the main breaker to your home before any electrical work begins.
- Conduit Paths: Create openings and run conduit from the ATS to the generator. This conduit will protect the electrical wires connecting the two units.
- Secure Connections: All wiring connections inside the ATS must be secure and properly insulated.
- Grounding: Ensure the ATS is properly grounded according to electrical codes. This is a job for a licensed electrician.
Step 5: Connect the Fuel Supply
This step requires precision and adherence to safety protocols, and often involves a licensed plumber or HVAC technician.
- Shut Off Fuel: Turn off the main fuel supply (natural gas valve or propane tank valve).
- Connect Lines: Run the appropriate fuel line from the generator to its source (existing natural gas line or a new dedicated propane/diesel tank).
- Seal Leaks: Use pipe sealant or tape on all threaded connections to create a leak-proof seal.
- Leak Check: Once connected, slowly turn on the fuel supply and use a soapy water solution to check for any bubbles, which indicate a leak. If you see any, immediately shut off the fuel and tighten the connection. If you are unsure at any point, do not hesitate to call a professional.
Step 6: Wire the Electrical System
With the fuel connected, the electrical wiring is next. Again, the main breaker must be off.
- Run Wiring: Electrical wiring and necessary circuit breakers are run from the generator to the ATS.
- Verify Voltage: A licensed electrician will use a multimeter to verify correct voltage and polarity.
- Secure & Ground: All wiring connections must be secure, properly insulated, and the entire system must be correctly grounded according to National Electrical Code (NEC) standards. This is where professional expertise is non-negotiable for safety and compliance.
Step 7: Ground the Generator
Proper grounding is a critical safety measure, protecting your home and the generator from electrical surges.
- Grounding Rod: Drive a copper grounding rod into the soil near the generator. The depth and type of rod are specified by electrical codes.
- Connect Wiring: Connect copper wiring from the generator’s designated grounding terminal to the rod.
- Corrosion-Free: Ensure all connections are secure and corrosion-free, often using specialized clamps or anti-corrosion compounds.
Step 8: Test the System & Final Inspection
Once everything is connected, it’s time to put your new system to the test.
- Simulate Outage: With the main utility breaker turned off, the ATS should detect the power loss and automatically start the generator.
- Verify Power: Confirm that essential appliances and circuits in your home are receiving power from the generator.
- Monitor Performance: Check for any unusual noises, vibrations, or warning lights on the generator. Do a final visual check for fuel leaks.
- Professional Review: A final inspection by your local building authority and the installing professionals will verify everything meets code and operates safely.
Step 9: Cleanup & Final Adjustments
After the heavy lifting, a final cleanup ensures your site is safe and tidy.
- Remove Debris: Clear all construction debris.
- Secure Lines: Ensure all wiring and fuel lines are neatly secured and protected.
- Level Check: Confirm the generator is still level and stable.
- User Training: Your installer should walk you through the basic operation, any control panels, and essential maintenance tasks, such as checking oil levels and battery status.
Beyond Installation: Smart Features and Ongoing Maintenance
Modern standby generators aren't just workhorses; they're smart devices designed for reliability and convenience.
- Self-Testing Routines: Many units feature automatic self-testing, typically running for about 20 minutes every week or two. This ensures all components are functioning correctly and helps detect potential problems early. Some even send diagnostic signals to the manufacturer or your service provider via the internet.
- Remote Monitoring: With internet connectivity, you can receive automatic notifications on your smartphone or computer if your generator activates during an outage, or if it requires service. This remote access provides real-time status updates and can even facilitate remote troubleshooting.
- Regular Maintenance: To ensure your generator is always ready, adhere to the manufacturer's maintenance schedule. This usually includes:
- Oil and Filter Changes: Just like a car, the engine needs fresh oil and filters.
- Spark Plug Checks: Ensure proper ignition.
- Battery Inspection: The battery needs to be charged and free of corrosion to start the generator reliably.
- Clearance: Keep the area around the generator clear of debris, snow, and vegetation to ensure proper airflow and prevent overheating.
- Annual Professional Inspections: Schedule a licensed technician for an annual check-up to catch any issues before they become major problems.
Safety First, Always
While standby generators offer immense convenience, safety must always be paramount.
- Professional Installation is Non-Negotiable: We cannot stress this enough. Hiring licensed electricians, plumbers, and general contractors is not just about compliance; it's about protecting your home, your family, and your investment. Professionals ensure safe electrical connections, leak-free fuel lines, proper grounding, and adherence to all local and national codes. It also validates your generator's warranty.
- Carbon Monoxide Safety: Operating a generator produces carbon monoxide (CO), a colorless, odorless, and deadly gas.
- Never operate a generator indoors or in an enclosed space, even with doors and windows open.
- Always place the generator in a well-ventilated outdoor area, adhering to the five-foot rule from any openings into your home.
- Install carbon monoxide detectors inside your home, particularly in sleeping areas. These are a life-saving necessity.
- Fuel Safety:
- Regularly inspect fuel lines for any signs of wear, cracks, or leaks.
- Know how to quickly and safely shut off your fuel supply in an emergency.
- Keep the area around fuel connections clear and accessible, as recommended by FEMA.
- For propane and diesel, ensure tanks are properly stored and maintained according to local regulations.
Understanding the Investment: What to Expect Financially
The cost of installing an automatic standby generator can vary significantly, reflecting the unit's size, your home's electrical complexity, local labor rates, and permit fees. However, it’s a long-term investment in comfort, safety, and property value.
On average, homeowners can expect to pay between $7,178 and $13,959 for a complete system, including:
- The Generator Unit: Ranging from $1,458 to $8,239, depending on brand, power output (kW), and features.
- Generator Installation: Averaging around $4,520, covering site preparation, positioning, and general setup.
- Automatic Transfer Switch (ATS) Installation: Averaging $1,200 for mounting and wiring into your electrical panel.
- Fuel Line Hookup: If you need a new natural gas line extension, factor in an additional $15–$20 per linear foot. Propane or diesel tank installation will have its own separate costs.
While these numbers represent a significant outlay, consider the peace of mind and protection they offer. The ability to automatically power your entire home during an outage, safeguarding your family, food, and comfort, makes it a worthwhile investment for many homeowners.
Your Next Steps: Powering Up Your Peace of Mind
Integrating an automatic standby generator into your home is a robust solution to the unpredictability of power outages. It’s a project that demands careful planning, adherence to safety standards, and the expertise of licensed professionals. By understanding the process, from permits to fuel lines, and recognizing the critical role of the ATS, you're well-equipped to make informed decisions for your home.
Don't wait for the next storm to consider your options. Start by researching local regulations, getting quotes from qualified installers, and determining the right generator type and size for your specific needs. With a little planning, you can ensure your home remains a haven, no matter what happens outside.